Farmhouse Kitchen Decor DIY Introduction
Farmhouse kitchen decor is all about creating a warm, inviting, and functional space that evokes a sense of comfort and simplicity. What better way to achieve this aesthetic than by undertaking some DIY projects? Not only will you personalize your kitchen, but you’ll also save money and enjoy the satisfaction of creating something with your own hands. This guide will walk you through five easy and accessible DIY farmhouse kitchen decor projects, perfect for beginners and seasoned DIY enthusiasts alike. Get ready to transform your kitchen into a charming, rustic haven, one project at a time. These projects are designed to be both aesthetically pleasing and practical, adding character and functionality to your culinary space. The beauty of farmhouse decor lies in its versatility; it blends seamlessly with various styles, offering a timeless appeal.
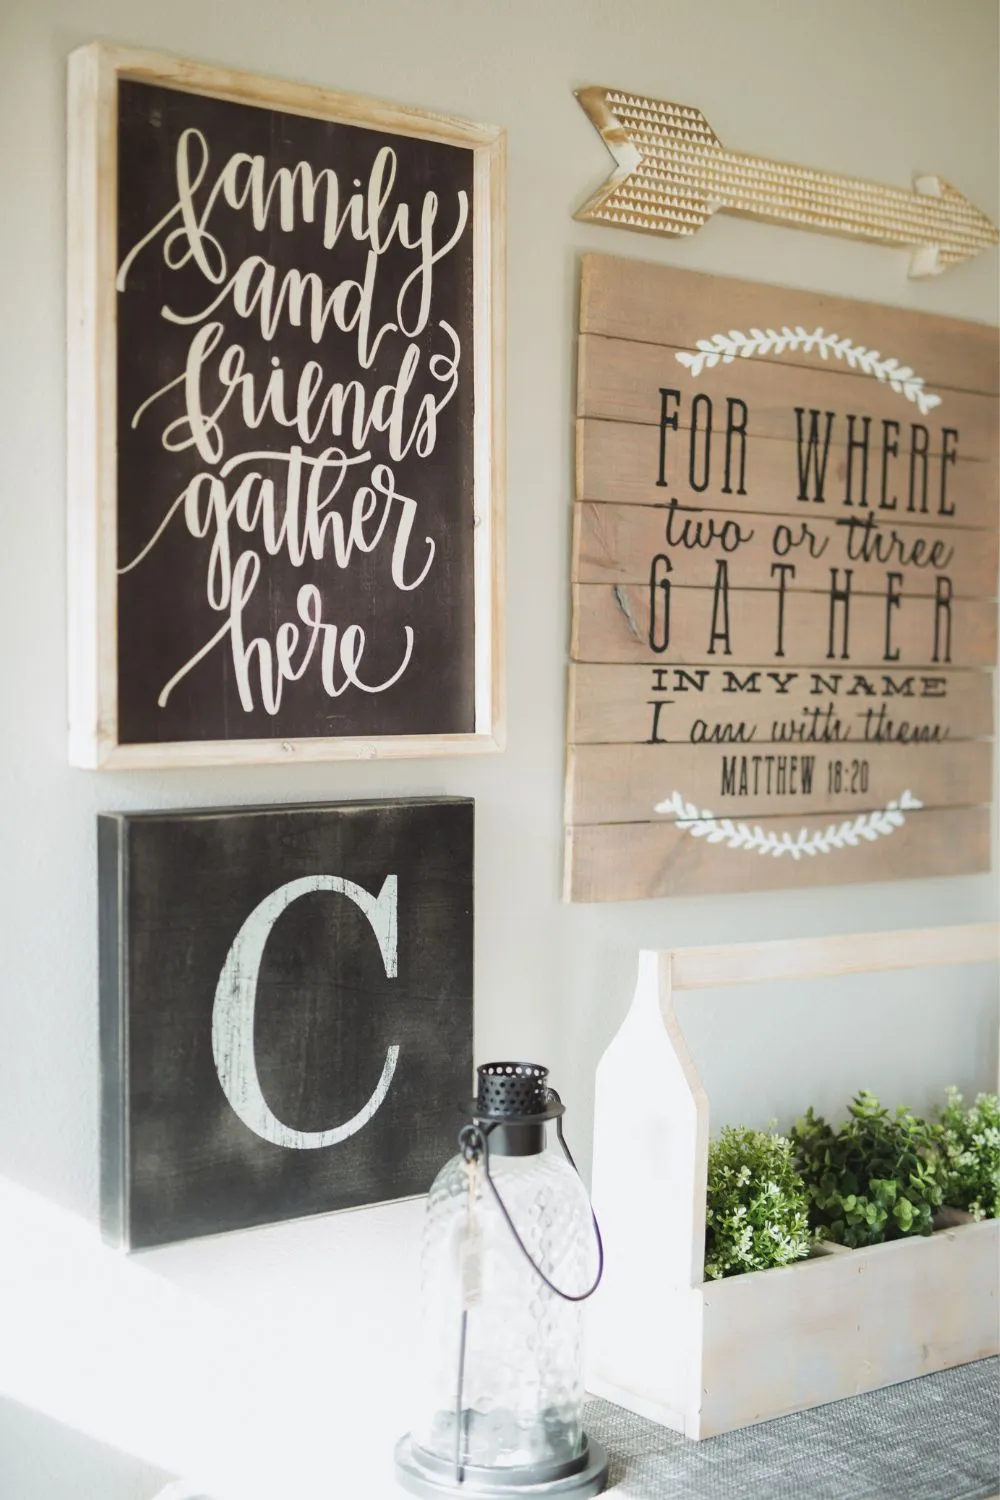
DIY Project 1 Creating a Rustic Wooden Sign
A rustic wooden sign is a quintessential farmhouse kitchen decor element, adding a touch of charm and personality to your space. They’re versatile, customizable, and relatively easy to make, even for those with minimal woodworking experience. A well-placed sign can set the tone for your kitchen, whether it’s a quote, a family name, or a simple kitchen-themed phrase. The weathered look of the wood adds to the rustic appeal, making it a perfect addition to your farmhouse aesthetic. This project offers an excellent opportunity to express your creativity and infuse your kitchen with your unique style.
Materials Needed for the Wooden Sign

To get started, you’ll need some basic materials that are readily available at most hardware stores or online. Gather a piece of reclaimed wood or a new piece of wood, ensuring it’s the size that fits your kitchen. You’ll also need sandpaper to smooth the surface, wood stain in your preferred color, stencils or a template for your chosen text, paint, a paintbrush or sponge, and protective gloves. Optional items include wood sealant for durability and hanging hardware like sawtooth hangers or picture-hanging wire. The specific type of wood and stain can vary depending on your preference; consider options like pine or cedar for a more rustic look, and choose a stain color that complements your kitchen’s color scheme. Remember to prioritize safety by wearing gloves and working in a well-ventilated area when staining and painting.
Step by Step Guide to Making the Wooden Sign
Begin by sanding the wood to ensure a smooth surface. Then, apply the wood stain evenly, wiping off any excess. Allow the stain to dry completely according to the product instructions. Next, position your stencil or template onto the wood. Using a paintbrush or sponge, carefully apply paint to the stenciled area. Let the paint dry and then gently remove the stencil. If desired, you can distress the sign by lightly sanding the edges or using a distressing tool to give it a weathered appearance. Finally, apply a sealant if you want to protect the sign. Attach the hanging hardware to the back and your sign is ready to hang. This project is a great way to add a personalized touch to your kitchen and showcase your creativity.
DIY Project 2 Building a Farmhouse Style Floating Shelf
Floating shelves are not only functional but also add a touch of elegance and openness to your kitchen. Farmhouse-style floating shelves are particularly appealing, providing a perfect display space for your favorite kitchen items, such as cookbooks, decorative jars, or plants. These shelves can significantly enhance the aesthetic appeal of your kitchen, creating a more organized and stylish environment. The simplicity and clean lines of floating shelves perfectly complement the farmhouse aesthetic, adding visual interest without cluttering the space. The ability to customize the size, wood type, and finish makes this a versatile DIY project, suitable for any kitchen.
Materials for the Floating Shelf Project

You’ll need wood for the shelf itself, preferably a sturdy type such as pine or reclaimed wood, depending on the weight the shelf will need to bear. You’ll also need shelf brackets, screws, a drill, a level, sandpaper, wood stain or paint, and a measuring tape. Ensure you select brackets that are appropriate for the weight of the items you plan to display. Choose screws that are the right length for securing the brackets to both the wall and the shelf. Safety glasses are highly recommended to protect your eyes while drilling and sanding. Pre-drilling pilot holes can help prevent the wood from splitting when inserting screws. Consider using a stud finder to ensure the shelves are securely mounted to the wall studs, providing maximum support and safety.
Building the Floating Shelf Step by Step
Measure and cut the wood to the desired shelf length. Sand the wood to ensure a smooth finish. Apply stain or paint, then allow it to dry completely. Attach the shelf brackets to the wall using screws, making sure they are level. Next, attach the shelf to the brackets, again using screws to secure it. Ensure the shelf is level before tightening all screws. This process might be easier with a helper, particularly when attaching the shelf to the brackets. Once installed, you can decorate your new floating shelf with farmhouse-themed items like mason jars, small potted plants, or vintage-style kitchenware. A well-placed floating shelf can instantly elevate the look of your kitchen, combining functionality with aesthetic appeal.
DIY Project 3 Painting Mason Jars for Decor
Mason jars are incredibly versatile and an essential element in farmhouse kitchen decor. Painting them is a simple and affordable way to add a splash of color and texture to your kitchen. Painted mason jars can be used as vases, utensil holders, storage containers, or simply as decorative accents on shelves or countertops. The ability to customize the color and finish of the jars makes this project endlessly adaptable to your existing kitchen decor. This project is an excellent opportunity to introduce pops of color or tie in the color scheme. Painted jars also bring a handmade, rustic charm that perfectly embodies the farmhouse aesthetic, adding a sense of warmth and personality.
Materials for Painting Mason Jars

You’ll need mason jars in various sizes, acrylic paint in your chosen colors, paintbrushes or foam brushes, sandpaper, and a sealer (optional). Chalk paint is a popular choice for a distressed farmhouse look. Consider using multiple colors to create a coordinated look. You can also experiment with different finishes, such as matte, gloss, or metallic. Gather the required tools and set up a dedicated workspace that is protected from spills. Ensure your workspace is well-ventilated to allow proper drying and to avoid inhaling paint fumes. Consider using painter’s tape to create patterns or designs. Remember to protect your work surface with newspaper or a drop cloth.
How to Paint and Distress Mason Jars
Start by cleaning and drying the mason jars thoroughly. Apply one or two coats of acrylic paint, allowing each coat to dry completely. For a distressed look, gently sand the edges and raised areas of the jars after the paint has dried. This will create a worn, vintage effect. Optionally, apply a sealer to protect the paint and add durability. Experiment with different techniques, such as dry brushing or stenciling, to add character and personality to your jars. Let your creativity guide you; you can create a cohesive set of jars or mix and match colors and styles. Once your painted mason jars are dry, you can arrange them creatively in your kitchen, filling them with flowers, utensils, or other decorative items.
DIY Project 4 Crafting a Farmhouse Kitchen Island Centerpiece
A well-chosen centerpiece can dramatically enhance the visual appeal of your kitchen island, serving as a focal point that draws the eye and adds a touch of elegance. A farmhouse-style centerpiece typically incorporates natural elements and rustic accents, such as wood, greenery, and vintage-inspired items. This project allows you to create a unique centerpiece that reflects your style and adds warmth to your kitchen. A beautifully designed centerpiece adds personality and charm. It’s a great way to showcase seasonal decorations or simply add a touch of beauty to your everyday kitchen setup.
Items Needed for the Centerpiece

Gather a base for your centerpiece, such as a wooden tray, a rustic breadboard, or a decorative box. You’ll also need items to fill your centerpiece, such as a vase or a set of mason jars, faux or real greenery (like eucalyptus or lavender), candles, and decorative accents (such as wooden beads, small signs, or vintage-style kitchenware). Choose items that complement your kitchen’s color scheme and overall style. Consider the size of your kitchen island when selecting your centerpiece; ensure it’s proportionate to the space. Select items that are easy to clean and maintain, and consider the safety of candles and other potentially hazardous items.
Assembling Your Kitchen Island Centerpiece
Start by placing the base on your kitchen island. Arrange your vase or mason jars on the base. Fill the vases with greenery, ensuring a natural and balanced look. Add candles or other decorative accents around the greenery. Experiment with different arrangements until you achieve the desired aesthetic. Consider the height and arrangement of the items to ensure they don’t obstruct views or interfere with kitchen activities. Rotate your centerpiece seasonally or change the decor to refresh the look of your kitchen. This easy project will add a focal point to your kitchen.
DIY Project 5 Making a Kitchen Herb Garden
A kitchen herb garden is both practical and aesthetically pleasing, adding a touch of freshness and vitality to your kitchen decor. Fresh herbs not only enhance the flavor of your meals but also provide a beautiful, natural element to your kitchen. A well-designed herb garden can transform a dull corner into a vibrant, aromatic space, reflecting the farmhouse aesthetic’s love for nature and functionality. Growing your own herbs is also a rewarding experience, connecting you to the source of your food and providing a continuous supply of fresh ingredients.
Choosing Your Herbs

Select herbs that you use frequently in your cooking and that thrive indoors, such as basil, mint, rosemary, thyme, and oregano. Consider the sunlight requirements of each herb; some herbs require more direct sunlight than others. Research the specific needs of each herb to ensure they thrive in your kitchen environment. Think about how you will use the herbs in your cooking to make the best choices. Opt for a mix of herbs that complement each other in terms of flavor and growth habits. You can even choose herbs based on their appearance; varieties with different leaf shapes and colors will add visual interest to your kitchen garden. It’s recommended to get started with at least 3-4 popular herbs to get started.
Creating Your Herb Garden
Choose containers for your herbs, such as mason jars, terracotta pots, or a wooden trough. Ensure the containers have drainage holes to prevent root rot. Use a well-draining potting mix suitable for herbs. Plant your herbs, spacing them appropriately. Place your herb garden in a location that receives adequate sunlight, typically near a sunny window. Water your herbs regularly, being careful not to overwater them. Consider a self-watering system to reduce maintenance. Regularly trim your herbs to encourage growth and use them in your cooking. You can also add decorative labels and elements to enhance the appearance of your herb garden, further complementing your farmhouse decor.
Farmhouse Kitchen Decor DIY Conclusion
Transforming your kitchen into a farmhouse haven is a rewarding experience. By undertaking these five DIY projects, you can infuse your kitchen with character, charm, and functionality. The rustic wooden sign, the floating shelves, the painted mason jars, the island centerpiece, and the herb garden are all accessible projects that will enhance your space. Embrace the process, have fun, and let your creativity shine. The beauty of farmhouse decor lies in its ability to create a warm, inviting, and personalized space. As you complete these projects, take pride in the work you’ve done and enjoy the beautiful and functional farmhouse kitchen you’ve created. Happy crafting!