Choosing Your DIY Kitchen Tray
Embarking on a DIY kitchen decor tray project is an excellent way to infuse personality and functionality into your kitchen space. The beauty of a DIY project lies in the ability to tailor the tray to your exact needs and aesthetic preferences. Before diving into the creative process, it’s essential to consider several factors to ensure your project’s success. Think about the primary purpose of the tray — will it be used for serving, displaying decor, or organizing essentials? This will influence the size, shape, and materials you choose. Also, consider the existing decor of your kitchen. Do you have a rustic, modern, or coastal theme? Your tray should complement and enhance this style. Finally, think about your skill level and the time you’re willing to invest. Some projects are quick and easy, while others require more advanced techniques. Preparing for these things will help make the experience a fun one.
Material Selection for Your Tray
The materials you choose will significantly impact the tray’s appearance, durability, and functionality. Each material offers a unique set of advantages, making it crucial to select the one that best suits your needs and style. Consider the weight of items the tray will carry, the ease of cleaning, and the overall aesthetic you wish to achieve. Furthermore, think about where the tray will be located. If it’s exposed to moisture or food spills, choose a material that is water-resistant and easy to wipe clean. The choice of material also impacts the tools and techniques you’ll need, so make sure you feel comfortable with those as well.
Wood

Wood is a classic choice for kitchen trays, offering warmth, versatility, and a natural aesthetic. Different types of wood provide varying levels of durability and visual appeal. Pine is a budget-friendly option, easy to work with, and readily available, making it ideal for beginners. However, it’s softer than other woods and more prone to dents. Oak and maple are more durable and provide a beautiful grain pattern, making them perfect for a more polished look. Consider using reclaimed wood for a rustic, eco-friendly touch. When working with wood, sanding, staining, and sealing are essential to protect it from moisture and enhance its appearance. A food-safe sealant is crucial if the tray will be used for serving food.
Metal
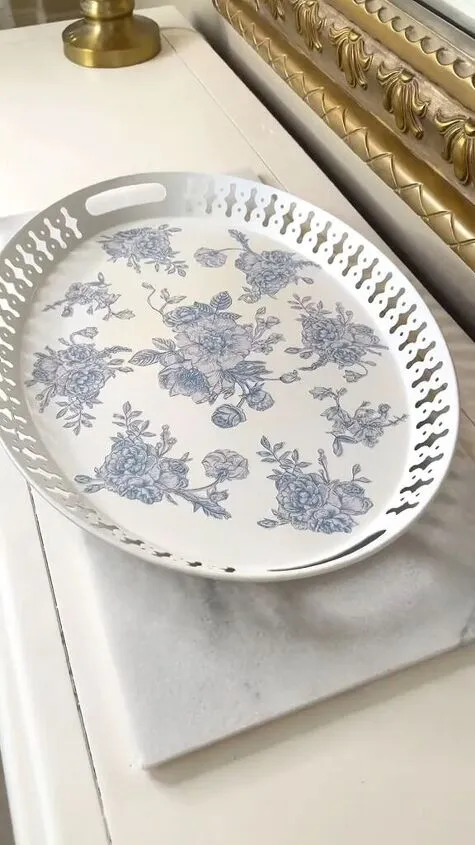
Metal trays offer a sleek, modern aesthetic and are highly durable and easy to clean. Stainless steel is a popular choice for its resistance to rust and its hygienic properties, making it suitable for kitchen use. Aluminum is lightweight and affordable, but it can be prone to dents. Consider using galvanized metal for a rustic industrial look, or opt for copper or brass for a touch of elegance. Metal trays can be painted or powder-coated to match your kitchen’s color scheme. Be mindful of sharp edges and ensure that any exposed metal is properly finished to prevent injury. Metal trays can be dressed up with decorative handles or embellishments to suit your taste.
Acrylic
Acrylic trays provide a contemporary look, offering a transparent or colored finish that can complement any decor. Acrylic is lightweight, shatter-resistant, and easy to clean, making it practical for everyday use. Clear acrylic trays are ideal for displaying decorative items while protecting surfaces. Colored acrylic trays add a pop of color and can be customized to match your kitchen’s palette. When working with acrylic, avoid harsh abrasives that can scratch the surface. Instead, clean with a soft cloth and mild soap. Acrylic trays can be embellished with vinyl decals, paint, or decorative accents to add a personal touch and unique design.
Glass

Glass trays offer a sophisticated and elegant look, and can be used to display decorative items. They are easy to clean and can create a sense of openness. However, glass can be fragile and requires careful handling. Tempered glass is more resistant to breakage, making it a better choice for kitchen use. Consider adding a non-slip surface to the bottom of the tray to prevent it from sliding on countertops. Glass trays can be decorated with paint, adhesive vinyl, or etched designs to create a custom look. When working with glass, always wear safety glasses and handle it with care to prevent accidents. This material will add a stunning look to your kitchen design.
Designing Your Kitchen Tray
Once you’ve chosen your materials, it’s time to design your tray. This is where you get to express your creativity and tailor the tray to your specific needs and preferences. Think about the shape, size, and overall aesthetic you want to achieve. Consider the items the tray will hold and how they will fit and be displayed. Planning your design in advance will save you time and effort during the construction phase. Sketching your design on paper can help you visualize the final product and identify any potential issues. This step ensures that the final product is both functional and visually appealing.
Shape and Size
The shape and size of your kitchen tray should be determined by its intended use and the available space in your kitchen. Rectangular trays are versatile and can be used for a variety of purposes, from serving food to organizing utensils. Square trays offer a modern look and can be ideal for displaying decorative items or creating a small coffee station. Round trays add a touch of elegance and can be used for serving drinks or displaying a collection of items. Consider the dimensions of your kitchen surfaces, such as countertops and tables, to ensure the tray fits comfortably. Measure the items you plan to place on the tray to determine the appropriate size. It’s also important to consider the height of the tray, especially if it will be used to store items under cabinets or in pantries.
Color Palette and Themes

The color palette and theme of your DIY kitchen tray should complement your existing kitchen decor. Consider the colors already present in your kitchen and choose a palette that harmonizes with them. Neutral colors, such as white, gray, and beige, offer a clean and versatile look that can easily blend with any style. Bold colors, such as red, blue, or green, can add a pop of personality and make the tray a focal point. Consider your kitchen’s theme, such as rustic, modern, coastal, or farmhouse, and choose colors and patterns that align with that style. Stencils, patterned paper, or fabric can be used to add visual interest and enhance the theme. Coordinating the colors with your kitchen’s overall design will create a cohesive and visually appealing space.
Adding Decorative Elements
Adding decorative elements to your DIY kitchen tray allows you to infuse your personality and style into the design, transforming a functional item into a beautiful piece of decor. The addition of handles, embellishments, and finishes can elevate the tray’s aesthetic and make it a unique statement piece. Choose elements that complement the materials and style of your tray. Whether you prefer a minimalist look or a more elaborate design, the details you choose will make your kitchen tray a standout.
Handles and Hardware
Handles are a practical and decorative addition to any kitchen tray, making it easier to carry and adding visual interest. Choose handles that are proportionate to the size of the tray. For a rustic look, consider using rope, leather, or metal handles with a distressed finish. Modern trays can benefit from sleek, minimalist handles made of metal or acrylic. Ensure that the handles are securely attached to the tray, using appropriate screws or adhesive. Consider the placement of the handles and choose a design that is comfortable to hold. Handle selection and placement will greatly improve the functionality and the look of the project.
Embellishments and Finishes

Embellishments and finishes can add a touch of elegance and personality to your DIY kitchen tray. Paint, stain, and varnish can be used to protect the tray and enhance its appearance. Consider using stencils, decoupage, or decorative paper to add patterns and designs. For a farmhouse style, you might use distressed paint and stencils. For a modern tray, you can use metallic accents or geometric patterns. Adding a food-safe sealant is essential if the tray will be used for serving food. The right finish can make a dramatic difference in how the final product looks.
DIY Tray Projects
Here are a few ideas for different DIY kitchen tray projects, each designed to suit a different style and skill level, from farmhouse to modern, and coastal. These projects can inspire your own creation and help you tailor the tray to perfectly fit your kitchen decor and functional needs. These ideas are a great start for your project, and help give you ideas that you can use for your own design.
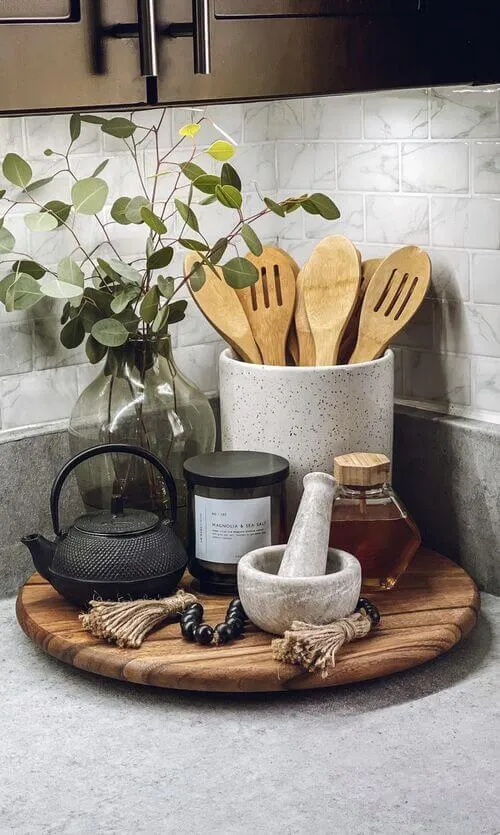
Rustic Farmhouse Tray
Create a rustic farmhouse tray using reclaimed wood. Sand and stain the wood to enhance its natural grain. Add metal handles with a distressed finish and stencil a farmhouse-inspired quote or design. This tray is perfect for adding a touch of country charm to your kitchen. The use of weathered wood and simple hardware will create a charming and functional piece that fits perfectly with farmhouse decor, and is easy to craft, even for beginners.
Modern Minimalist Tray
Build a modern minimalist tray using acrylic or stainless steel. Choose a simple rectangular or square shape. Use a clean, solid color palette. Add sleek, metallic handles or no handles at all for a truly minimalist look. This tray is perfect for displaying essential kitchen items in a sleek, understated way. A minimalist aesthetic can be achieved through clean lines and simple colors, perfect for a modern kitchen.
Coastal-Themed Tray
Design a coastal-themed tray using light-colored wood or acrylic. Paint the tray in shades of blue, white, and sand. Add seashells, starfish, or nautical-themed stencils. Use rope handles for a beachy touch. This tray will bring a refreshing coastal vibe to your kitchen decor. The use of light colors and nautical accents will evoke the relaxed and breezy feel of a coastal home.
Maintaining and Styling Your Tray
Once your DIY kitchen tray is complete, proper care and styling will keep it looking its best and help you maximize its functionality. Regular cleaning, appropriate storage, and thoughtful styling will help ensure your tray serves its purpose while adding a touch of personality and organization to your kitchen. Taking care of your creation will make it last and keep it looking beautiful.
Cleaning and Care Tips

The cleaning and care of your DIY kitchen tray will depend on the materials used. For wooden trays, wipe them down with a damp cloth and mild soap, then dry immediately to prevent water damage. Avoid harsh chemicals or abrasive cleaners. For metal trays, use a soft cloth and mild soap or a metal cleaner suitable for the material. Acrylic trays should be cleaned with a soft cloth and mild soap, avoiding abrasive cleaners that can scratch the surface. For glass trays, use a glass cleaner and a soft cloth. Always dry your tray thoroughly after cleaning to prevent water spots. Regular care will extend the life of your tray.
Styling Your Tray
Styling your DIY kitchen tray involves arranging items in a way that is both aesthetically pleasing and functional. Use the tray to organize frequently used items, such as spices, oils, or coffee essentials. Arrange items in a visually balanced way, considering the height, color, and texture of each item. Group similar items together and use decorative elements, such as small plants or candles, to add visual interest. For a more formal look, arrange items symmetrically. For a casual look, arrange items more informally. Remember, the goal is to create a display that is both attractive and practical, reflecting your personal style and taste.
Using Trays for Organization
DIY kitchen trays are incredibly versatile for organizing various items within your kitchen. Use a tray to create a coffee station on your countertop, holding coffee mugs, coffee beans, and sweeteners. Organize your cooking oils, spices, and frequently used ingredients on a tray near your stove. Place a tray on your kitchen island to hold fruits and vegetables. Keep your cleaning supplies, such as dish soap and sponges, organized on a tray near your sink. The use of trays helps keep your kitchen organized and adds a touch of style to your decor.
Conclusion
Creating a DIY kitchen decor tray is a rewarding project that allows you to personalize your kitchen and enhance its functionality. By carefully selecting your materials, designing a tray that fits your style, and adding decorative elements, you can create a unique piece that adds personality and charm to your kitchen. Remember to choose materials that complement your existing decor and meet your needs. With a little creativity, you can transform a simple tray into a stunning and practical accent piece. Enjoy the process of crafting and styling your tray, and savor the satisfaction of having a beautiful and functional addition to your kitchen. The possibilities are endless, so have fun and let your creativity flourish. Happy crafting!